

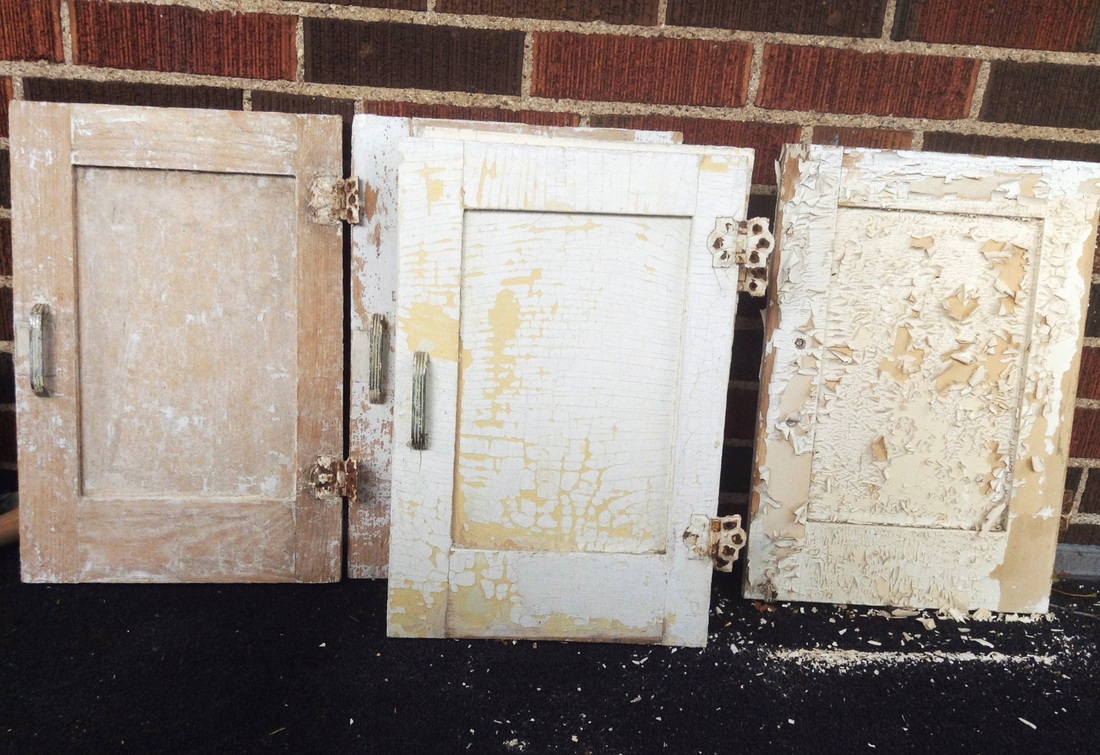
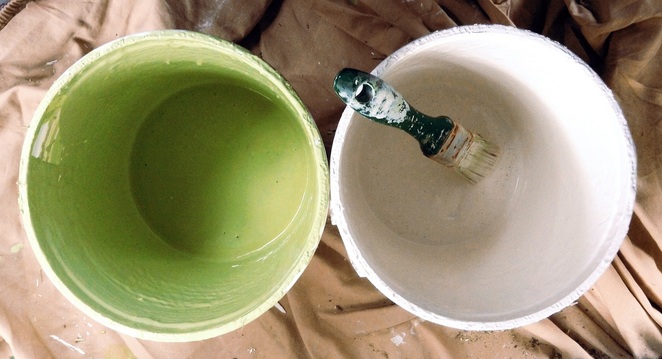
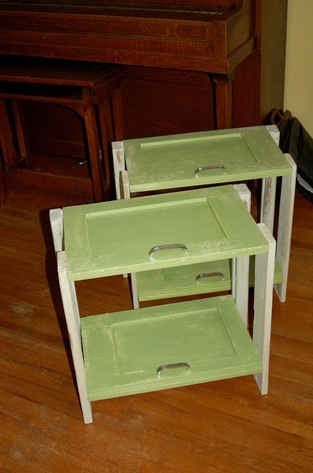
Fast forward a few seasons to this fall. I've been itching to fit my dining room with some storage to house my inventory so that it's easily accessible when people stop by the house to see my work. My dining room is smallish, a boxy extension of the living room so typical of 1940s houses, so storage options can be tricky. I had two small spaces where I could see putting some storage, so I started browsing online to see what Ikea, Canadian Tire, and all the others had to offer. I was underwhelmed at the options and defeated by the prices. But then - click! - the proverbial light bulb came on, and I thought, "I'll make something." And then - cachunk! - a giant floodlight came on, and I thought, "I'll make some tables out of those cupboard doors." I knew there was a reason I got them! Chalk Paint to the Rescue As you can see above, the cupboards were pretty beat up from sitting around for so long. I didn't feel like putting much more effort into refinishing them and I actually liked the distressed look they had, so I wanted to paint them with something that would adhere well, but still allow me to bring out some of the cupboards' distressed character. After some research, it looked like chalk paint would be my best bet, and because I'm cheap, I decided to make my own.
This recipe worked beautifully. The paint covered really well (with no primer!!!). I did a couple coats of soft white, followed by a couple coats of soft green, and then went over everything with some wet sandpaper to bring out the distressed texture of the weathered cupboard doors. Spiffy! 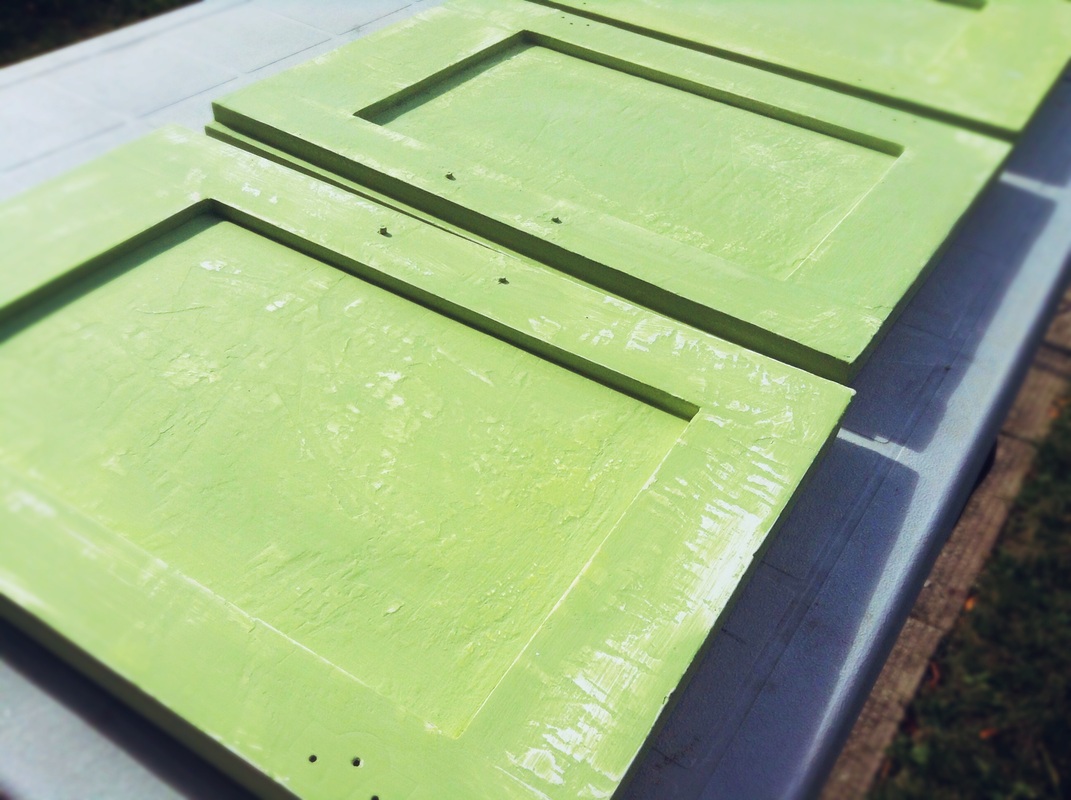 Great Legs: Pallet Wood For the table legs, I used planks from some old wood pallets I had salvaged from a few different places. I coated the wood with some white chalk paint, and once again distressed the finish with some wet sandpaper. The distressed boards were a great match for the weathered cupboard doors. 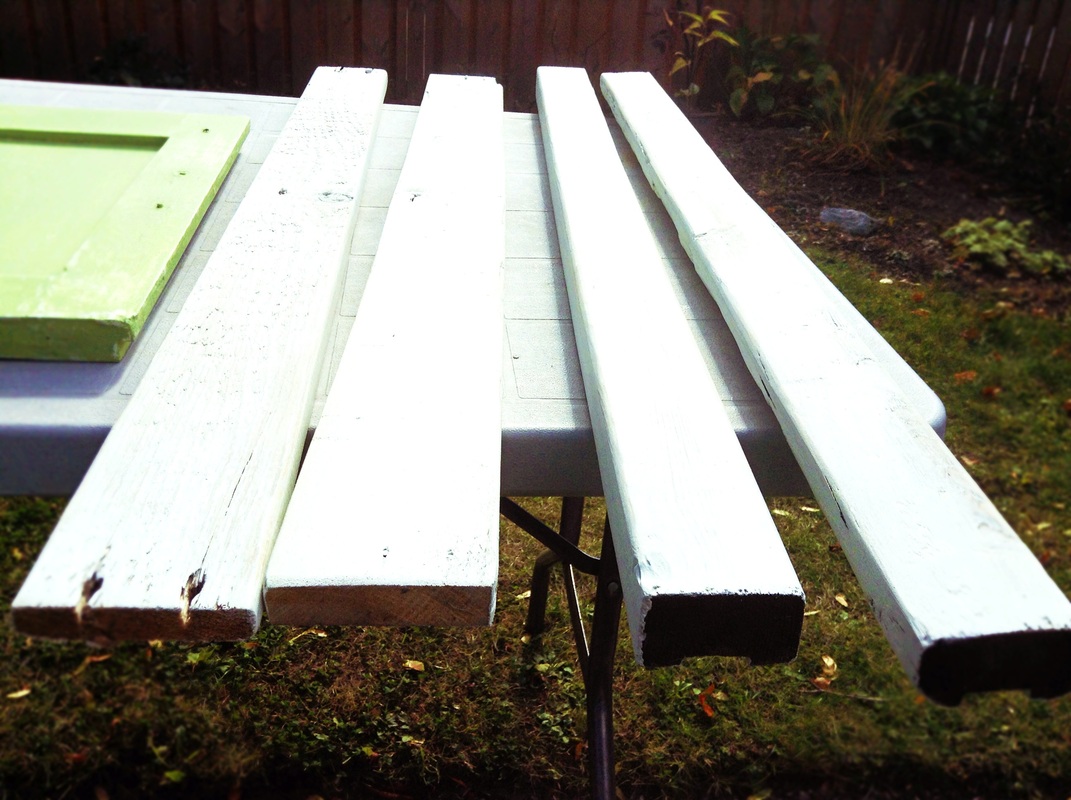
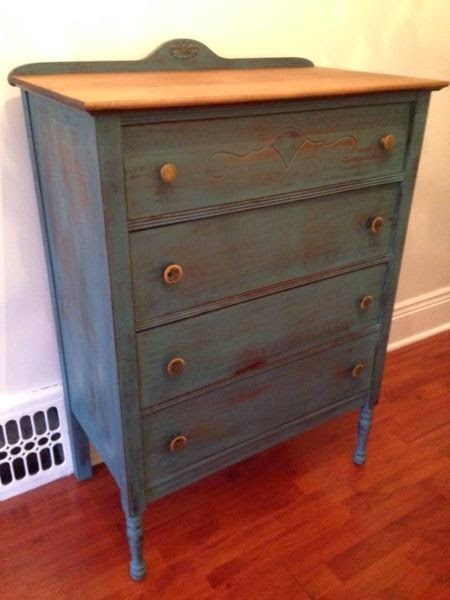
 My story about these quirky tables would be incomplete if I didn't mention someone who inspires me with her imagination and incredible talent with a can of paint. My friend Jen Vanderherberg takes discarded and neglected pieces of furniture and lovingly rejuvenates them into gorgeous, artful pieces. Her husband is an expert salvager, and together they find beautiful articles of furniture whose beauty has been worn down or stripped away. Jen uses an array of techniques to restore and/or refinish them, and then works her magic with chalk paint or milk paint. Set aside a couple hours, and spend some time perusing her blog to see all the gorgeous work she has done. To give you a taste, here's a wee sample of my favourites:
0 Comments
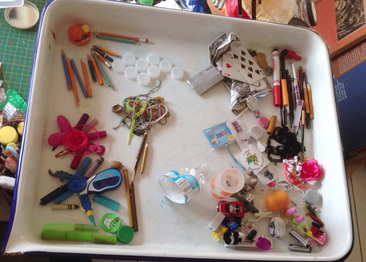
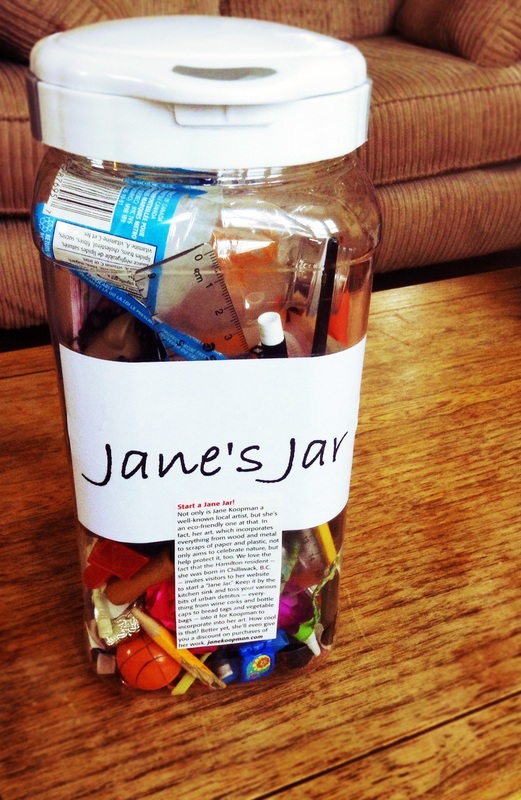
After all the kids had a closer look at the artwork, their teacher, Jennifer, brought home what this collaborative art project was all about: "I hope this experience has helped you think more carefully about what we throw away, and to find creative uses for the things we might throw away every day". Her words so articulately echoed what drives so much of what I do in my creative work. It has been such a thrill to meet a teacher and a group of students who are keen to be more creative and responsible in their approach to garbage. A few weeks ago, Jennifer sent me the article some of her students wrote about our project for their school newsletter. They've summed up the experience better than I ever could. From Junk to Art!  A few months ago, I embarked on a project with a sixth grade class at Chedoke Elementary in Hamilton. Jennifer Miscas, the teacher of this fine group of students, started a Jane Jar with her class at the beginning of the school year, and in January, she contacted me to see if I would create an art piece from the jar's contents. (You can read more about how this came about in my original blog post about the project's start.) I was thrilled and honoured by Jennifer's request. I finished the art piece in May and delivered it to Jennifer and her class. And with my impeccable timing, I'm finally getting around to writing about it just as all the kids head out for their well-deserved summer vacation. Sorry, guys. Nevertheless, let me tell you the story of how some sixth graders' junk turned into fabulous art supplies. This is how it all started: a big jar, full of lovely trash. 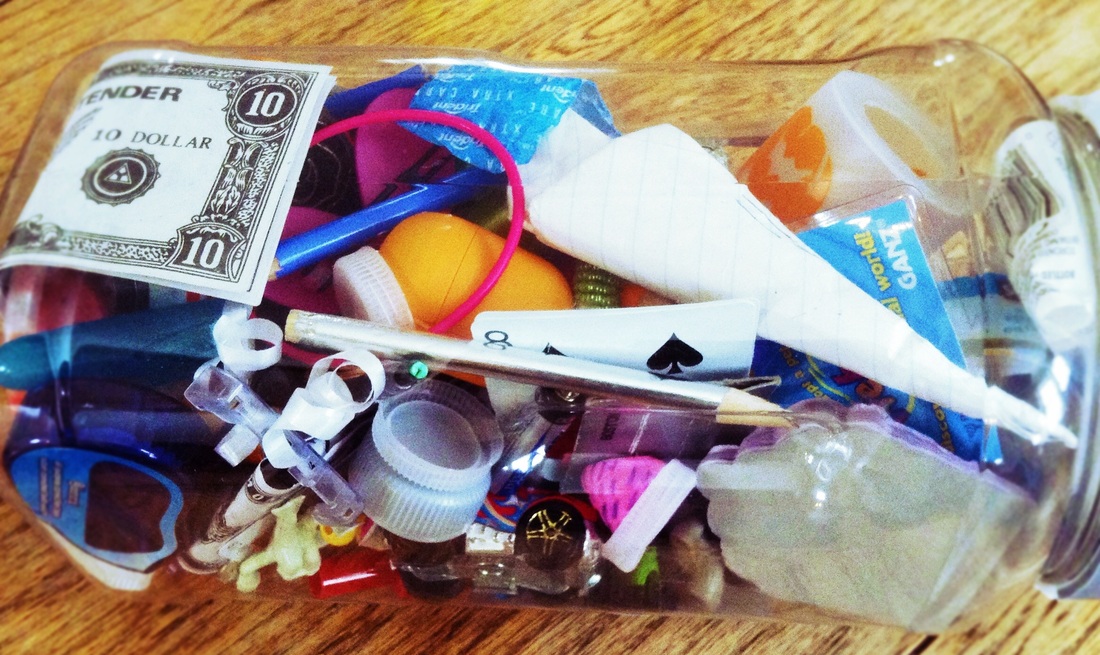
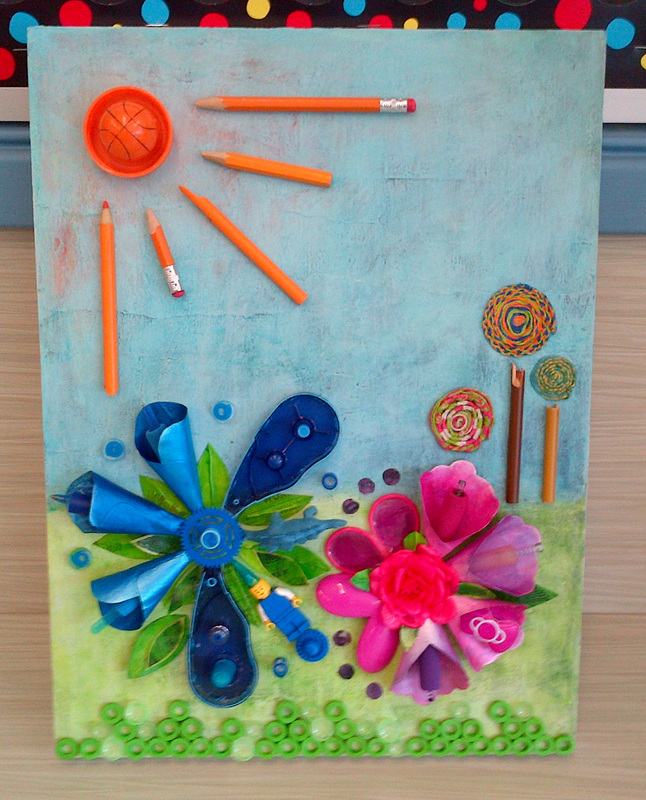
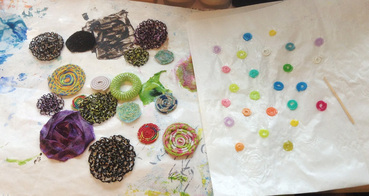
 The Best Art Supplies Ever Eventually all the garbage and repurposed components came together into this assemblage art piece, which I titled "Sixth Grade Landscape". Can you see what's in it? Keep reading to find out . . . 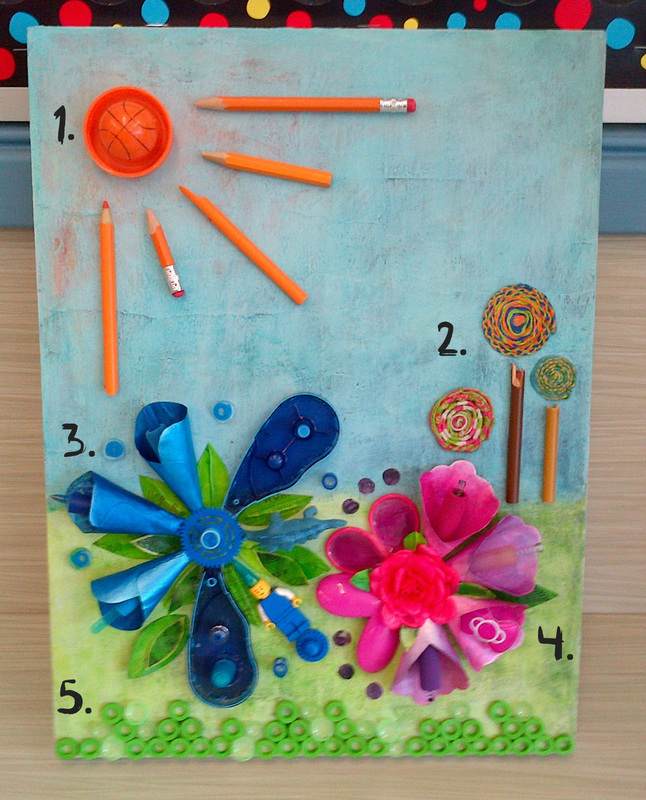 photo, Jennifer Miscas In my usual forgetfulness, I forgot to take a photo of the artwork, so Jennifer kindly provided me with this one. I've numbered the sections so you can see what went into each area of the artwork:
1. I made the sun out of a lid from a sports drink, a plastic basketball from a broken keychain, broken pencils, and broken pencil crayons. 2. The trees in the background are made from friendship bracelets and broken pencil crayons. 3. The blue flower has a lot of components.
I think that's everything . . . You might notice that not all of the components I made out of the kids' trash made it into the final artwork. These pieces are destined for another art adventure in my studio, and I have carefully stashed them away until their destiny is revealed. I have done the same with any of the garbage I didn't use from the sixth graders' collection. In my next post, I'll tell you about Part Two of this story: my visit with Jennifer and her delightful sixth graders. It was a great time, and I can't wait to tell you about it, so stay tuned. A while back, I wrote a post about repurposing clementine orange crates as shelving. I always have a stash of clementine crates that people save for me (thereby keeping them out of the landfill), and in most cases, I dismantle them to make other things. But there are also many ways to use these strong little wooden boxes around the house without much alteration. Reign in the Paper Clutter A standard clementine crate is 11.75" (30 cm) long and 8" (20 cm) wide (it is perhaps dorky that I know this, but there you go). So it's a good size for storing mail and paper clutter. I hot glued some burlap to this clementine crate (including the bottom so it doesn't mark up my counter) and set it on my kitchen counter to collect all the random papers that accumulate at our house. This keeps the papers in one place instead of scattered all over the place. Every few weeks, I sort through it to file things away or recycle the papers we don't need. Minimize Cupboard Chaos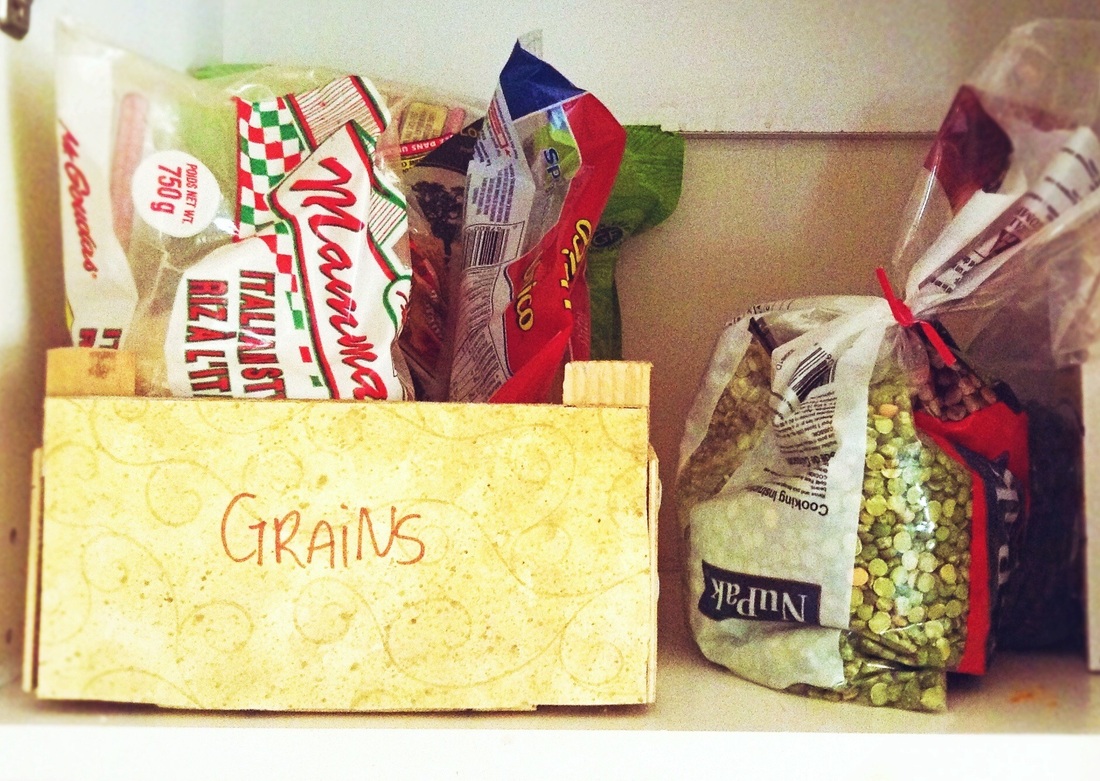 At 11" (30 cm), the length of a clementine crate suits the depth of any standard kitchen cupboard. It's a perfect basket for organizing bagged and packaged goods in your pantry or kitchen cupboards because it's straight and strong (after all, it carried 30 some odd pieces of fruit across thousands of kilometres). I covered this crate with paper and labelled it. When I need rice or noodles or quinoa, I just pull the crate off the shelf. Easy peasy, and no disastrous spills of thousands of tiny grains. Tidy Up Your Cookbook Stash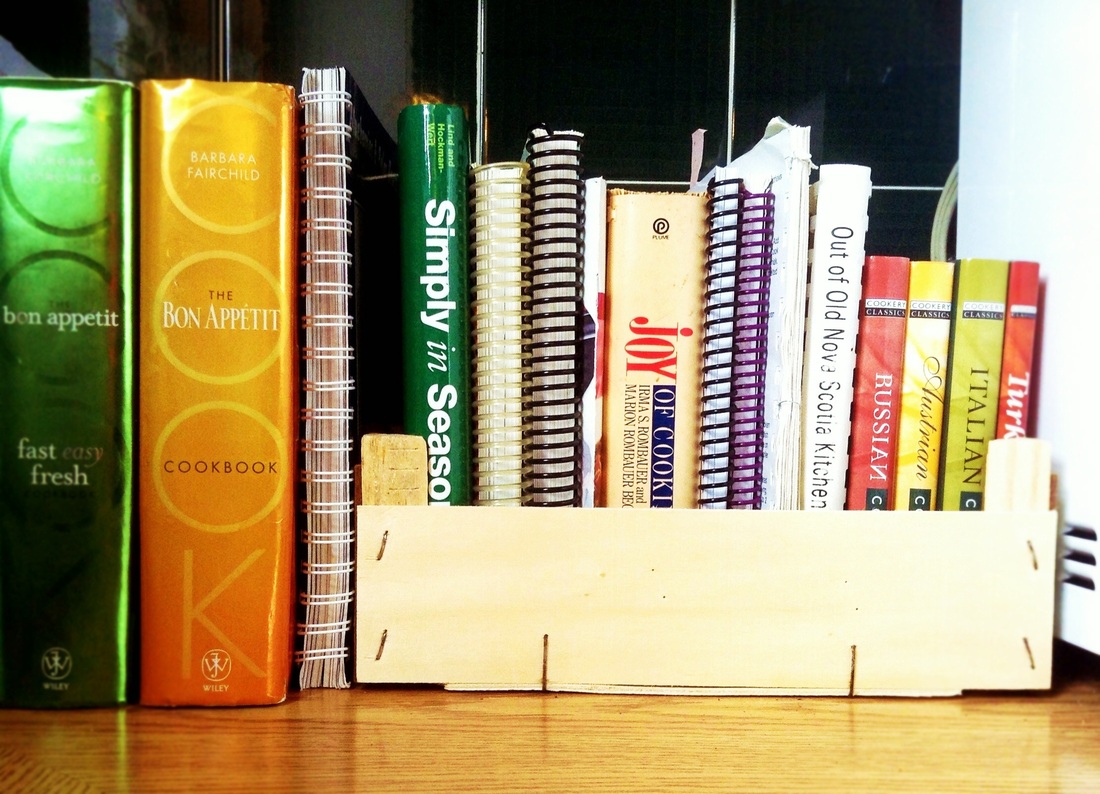 If you're like me, you have too many cookbooks: some enormous ones that nearly break your wrist when you pull them out of the stack and some small and thin ones that never stand up properly. A clementine crate is the perfect solution because it's the right size for small books, and its flat bottom and sides keep the books nice and straight. (It's okay: "flat bottom" makes me laugh too.) A clementine crate full of books makes a sturdy book-end for your wrist-breakers as well. So, there's three ideas for the next three clementine crates that come home with you from the grocery store. As for the rest, give them to me :)   In a sunny and busy classroom in Chedoke Elementary School, a fabulous group of sixth graders has been collecting junk for me. Their wonderful teacher, Jennifer Miscas, contacted me earlier this year to let me know her class had been filling a Jane Jar, and she wondered if I'd be interested in creating an art piece from the contents. Um, yes!
 This collaborative project represents everything I love about upcycling and art: a bridge for strangers to meet, a chance to capture moments in time, an opportunity to take a pause - however brief - to think about what and how much we throw away. And it's the start of something completely new. Lots of the junk in this jar will emerge in the art that I'll create for Jennifer and her sixth grade class. The rest of it will eventually find a purpose in something else I make, be it more artwork or a piece of jewelry. The possibilities are curious, colourful, exciting and abundant!
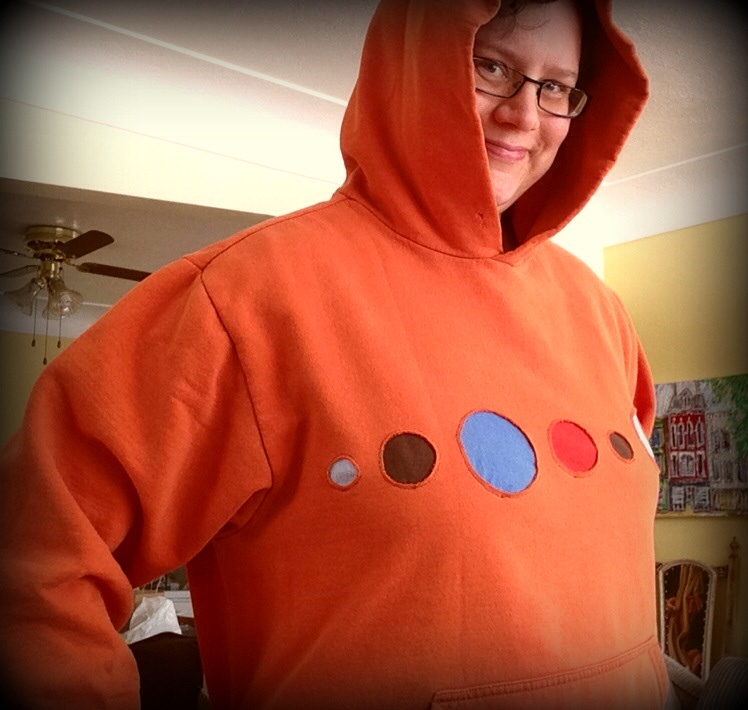
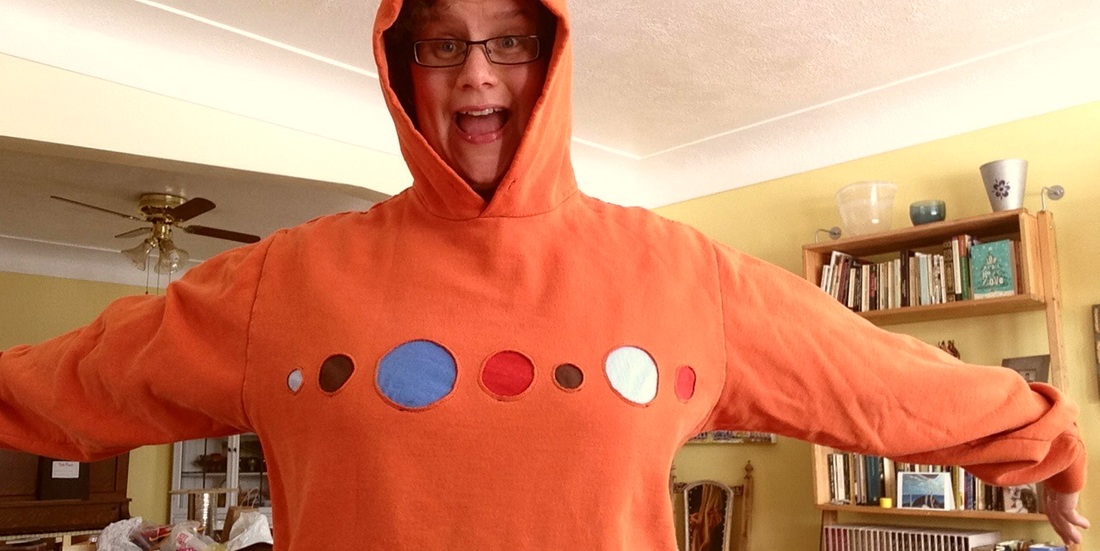  I am very attached to this orange sweatshirt. There's no reason for it: it's old, the drawstring for the hood has long disappeared, and orange looks terrible on me. But it's cozy and lumpy and soft and warm, and I love it. So when I got a stain on it a few months ago, I was dismayed. I've had it in my mind more and more that I'd like to upcycle my clothes that are worn, stained or ill-fitting. This seems to me a responsible way to manage my wardrobe: it would save me money and allow me to save beloved pieces. It would also prevent my clothes from becoming part of the pile of second hand store discards that get shipped overseas by the pound. (Millions of pounds of bulk second hand clothes get shipped from western nations to developing nations. There are mixed opinions about how these shipments impact local economies.) The only problem with my upcycling ambitions is that my sewing skills are, well, scarce. I have lots of ideas, but I'm not sure I have the skills to execute them. Serendipitously for me, some inspired young women in my church decided to start Sewing New Hope: a community sewing circle. Since January, we've hauled out our sewing machines every Thursday night and done some sewing between sips of coffee and intervals of conversation. Among this lovely group are some ladies with mad sewing skills, and they willingly help the rest of us who don't always know what we're doing. Each week has a project or sewing skill to focus on if we want, but we can also work on our own projects. This is my opportunity to bring some of my upcycling ideas to life, and I figured I'd start with my beloved orange sweatshirt. Here's what I did. Okay, so you can't really see the stain very well in this photo, but trust me, there's a stain. In the next photo, you'll see what the weird circles are. 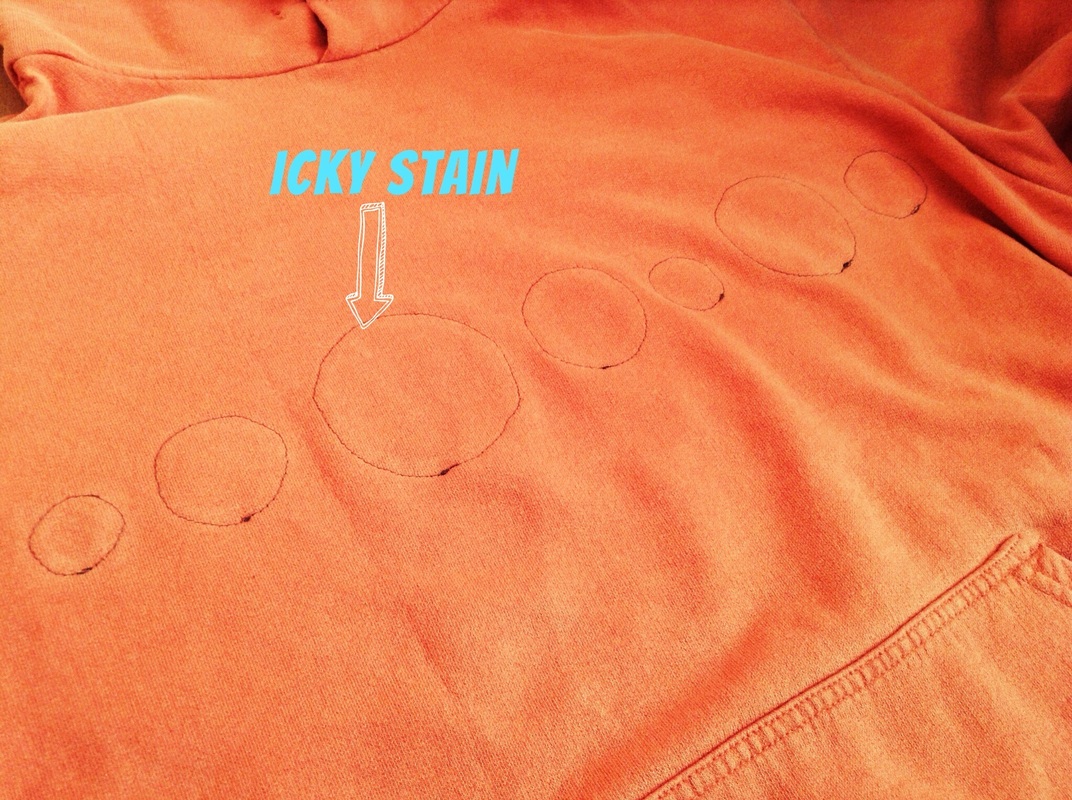 I cut circles out of some cotton t-shirt scraps in brown, light blue, medium blue and burnt orange. With safety pins, I pinned the circles onto the back of my sweatshirt because I wanted to create reverse patches (that's what I'm calling them, anyway). Following the advice of one of my smart sewing circle friends, I hand-basted the circles onto the shirt so that I wouldn't have to deal with pins while working with the sewing machine. For those of you who are sewing newbs like me, basting is loosely stitching something in place. It is also, of course, what you do when you cook a turkey.  And another tip for those with limited sewing experience: sewing circles with a sewing machine is not as simple as it might seem. Maybe modern machines can be programmed to sew curves - I have no idea - but my old-school Singer sews straight lines. This means I had to use a very light touch with the foot pedal and lift the sewing machine's presser foot every few stitches so that I could turn the fabric. I used brown thread to stitch all the circles. 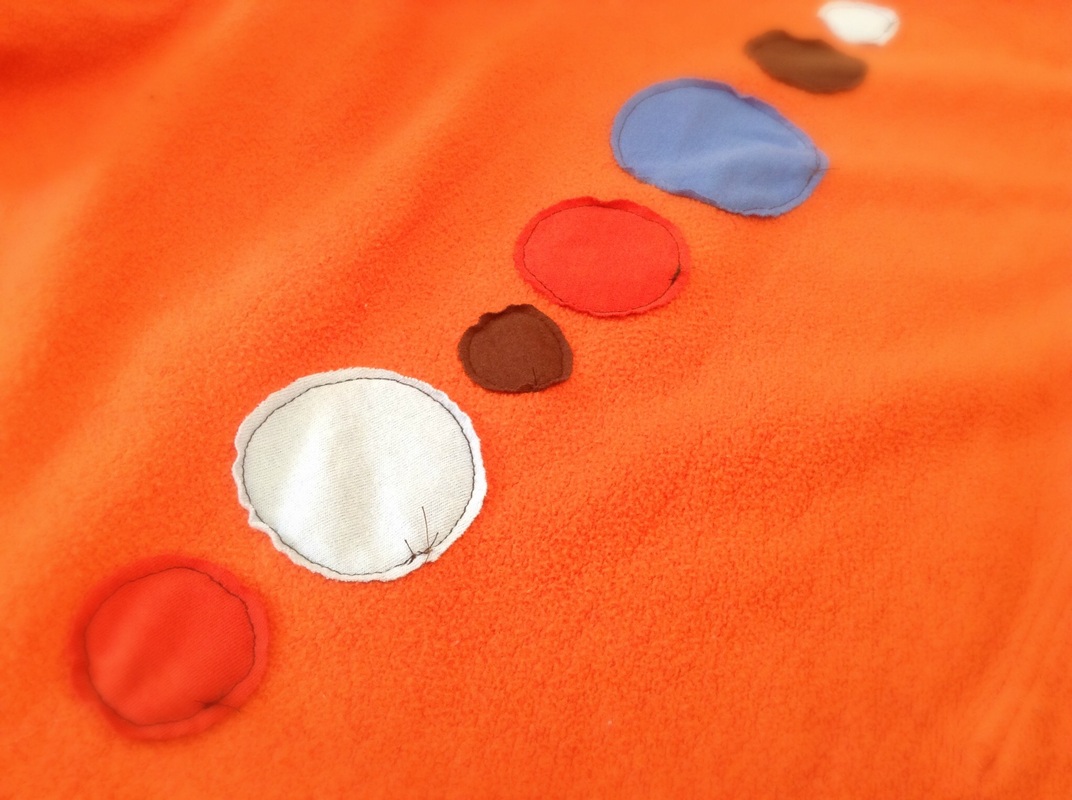 Here's what my sweatshirt looked like after I sewed the circles onto the back and turned it right side out. 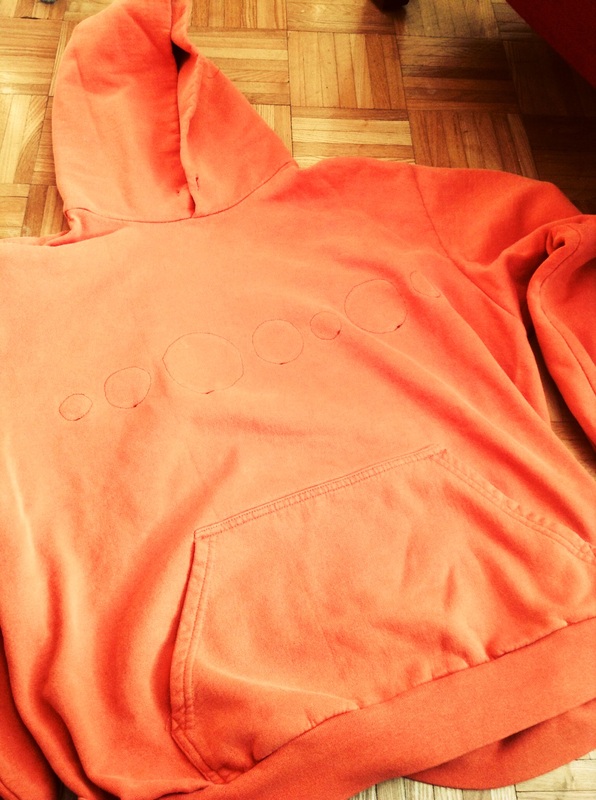 Next, I cut the sweatshirt fabric from the front of the shirt to reveal the patches beneath. With one hand inside the shirt holding the patch, I pulled the front fabric up with my other hand to separate the two pieces of fabric. Then, I nipped the front fabric, being careful not to cut the patch, and then cut out a circle along the stitching. 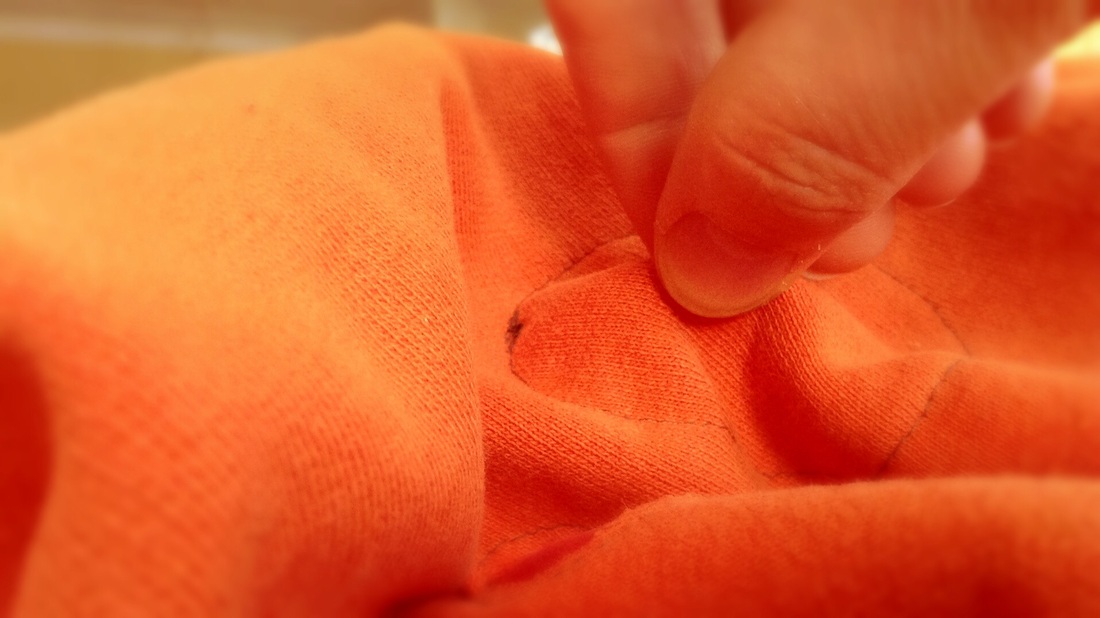  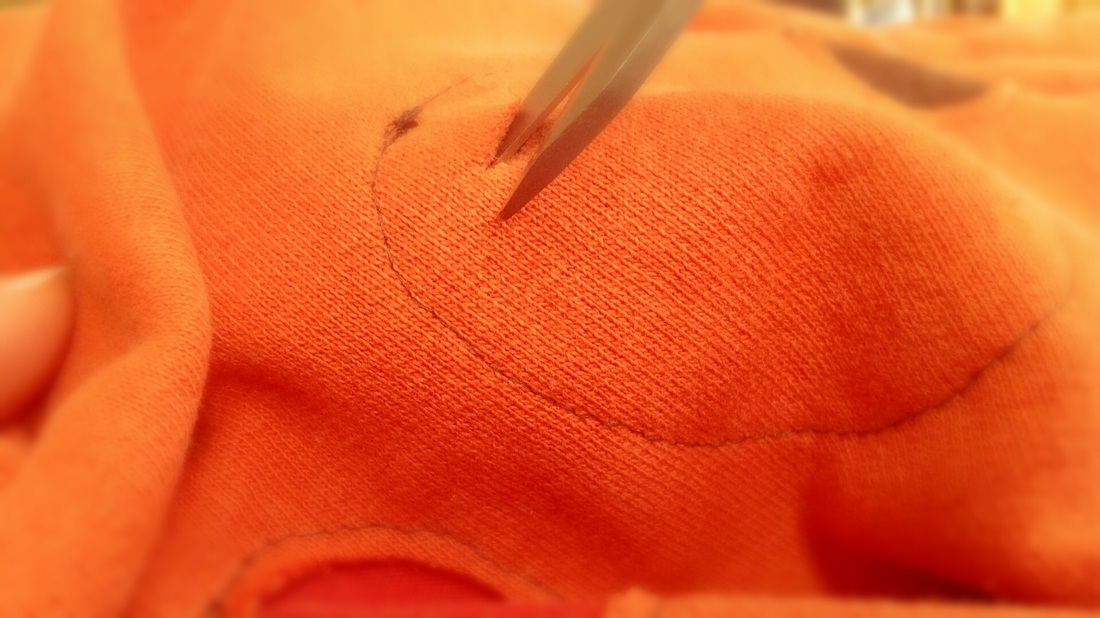 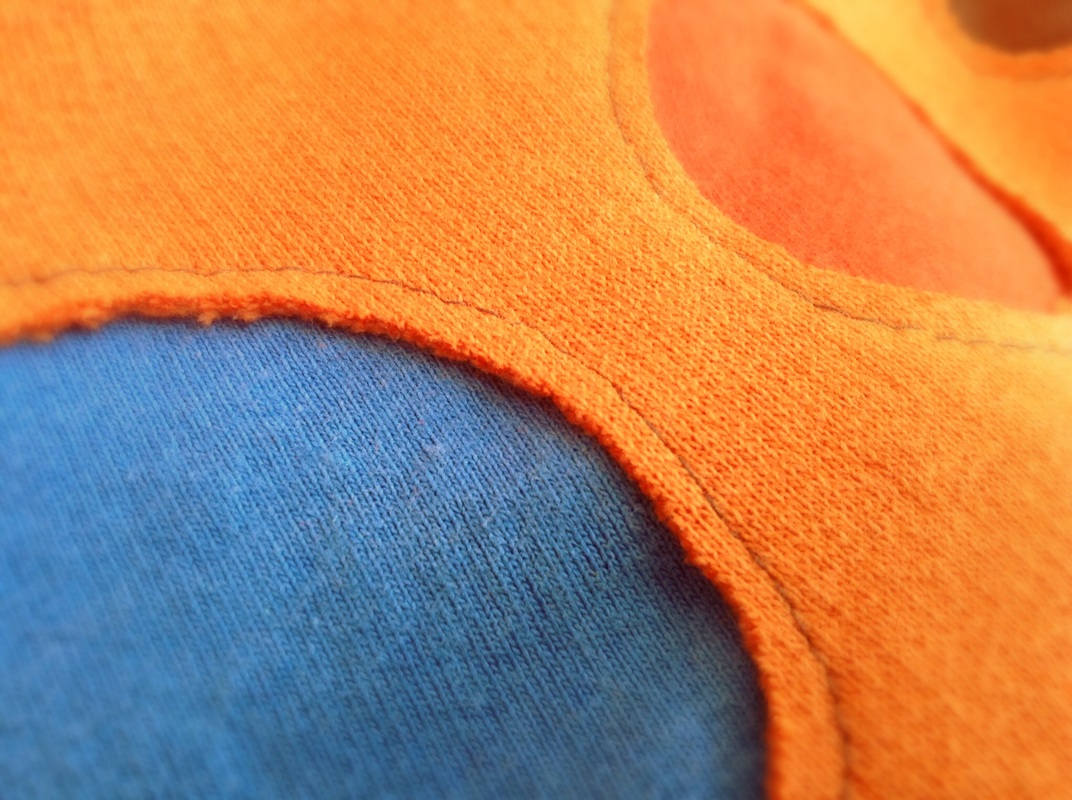 So there you have it: my beloved cozy sweatshirt reinvented. Not only is the unsightly stain gone, but my shirt has a unique and colourful new style that I'll be glad to wear.
Sorry if I've blinded you with all the orange.
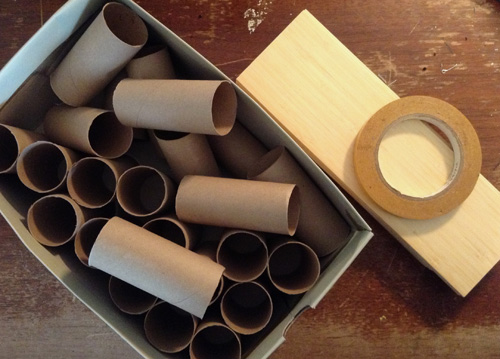
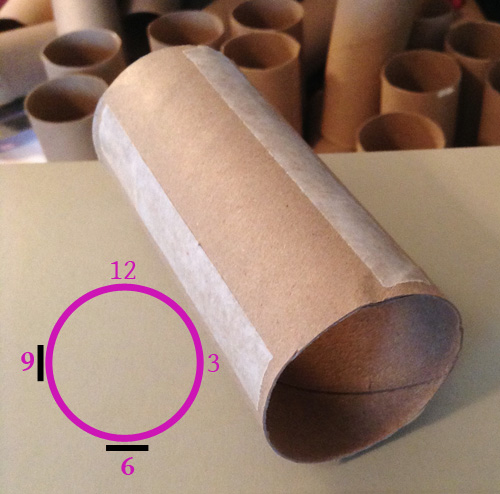
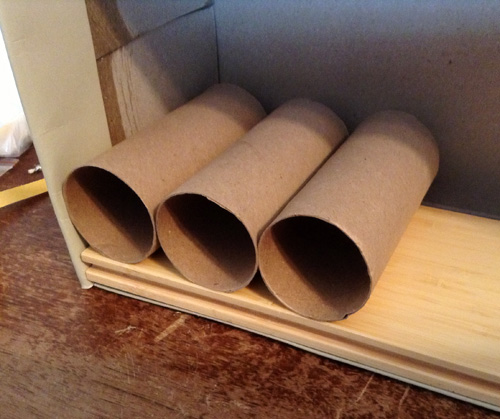
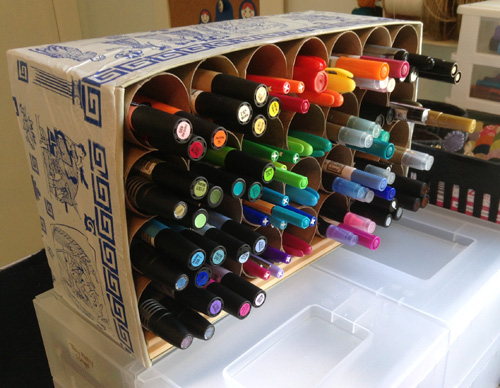
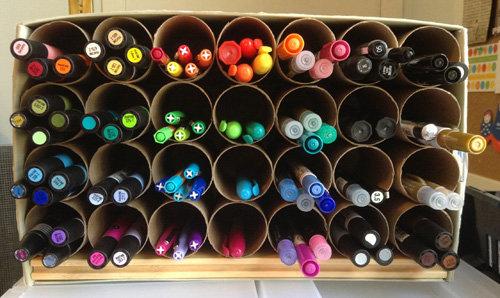
Now. What shall I upcycle next? I was super stoked to find this cool retro kitchen storage unit at my local reuse centre. I walked past it a few times, not really noticing its potential until - BAM! - it hit me: this would be perfect for bead storage in my studio. To be specific, seed beads. I think this plastic contraption was made probably to be a kitchen cupboard organizer for spices, by a company called Kitchen Art. I'm guessing it was made in the 80's. I have my seed beads organized into bottles by colour, plus some additional tubes full of beads. I stacked my bottles o' beads on the tiers of the kitchen organizer and put the tubes of seed beads into the organizer's handy pull-out drawer. Everything fits perfectly and is within easy reach of where I work. Dreamy bead storage. I love it when I find obscure and handy things like this! 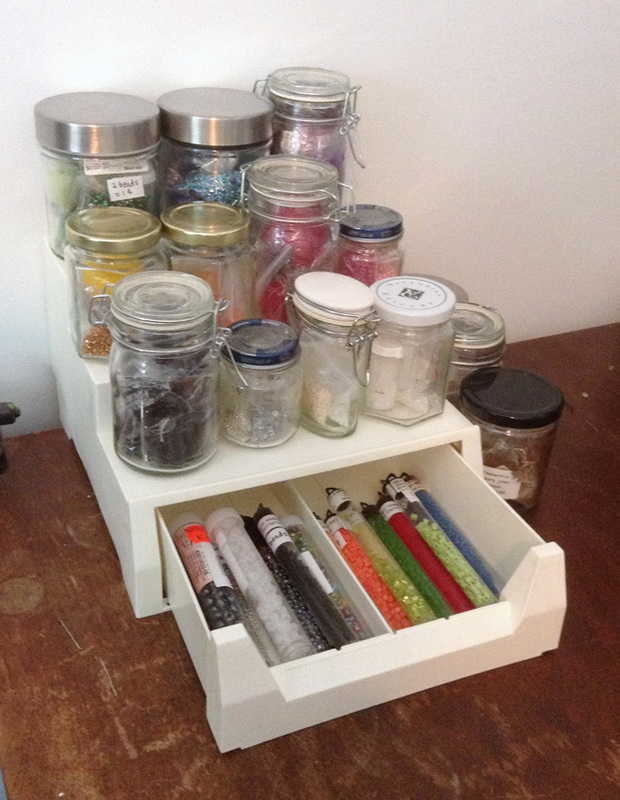 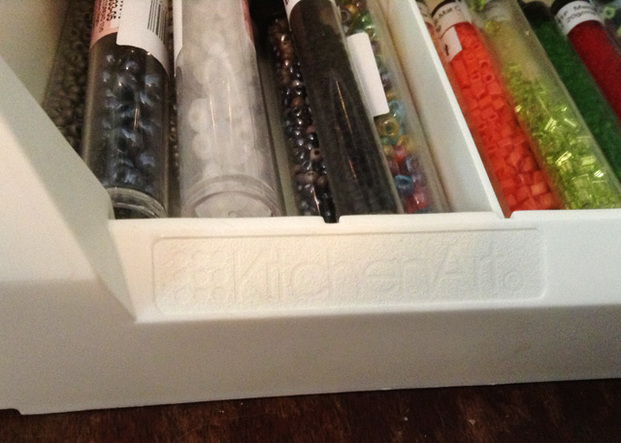 On Etsy.com, where I have my online shop, I am part of a team of other wonderful creatives who share my passion for upcycling. Each month, Team Upcyclers hosts a challenge: one of the team members chooses an item to upcycle - like wine corks, old sweaters or old neck ties - and the other team members respond by submitting new and innovative ways of reusing and repurposing the challenge item. You can see some of the past challenges by visiting the Team Upcyclers Blog. This month the upcycle challenge was to find a use for old and broken jewelry. This was a timely challenge for me because I recently acquired a few shoe boxes full of old and broken jewelry from my Mom and a couple aunts. I have reused a lot of the jewelry from these generous ladies to make other jewelry, but there are a few odds and ends that I can't use to make jewelry. This month's Team Upcyclers challenge provided the perfect opportunity to come up with some ideas. 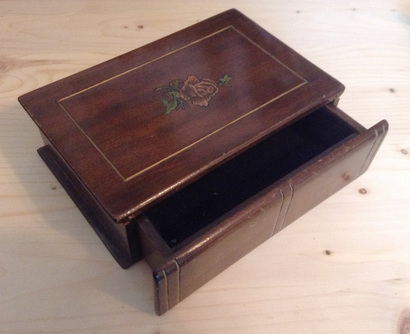 One night, I woke up in the middle of the night with an idea of what to do. Why not spruce up an old jewelry box by using old jewelry? It was hard to get back to sleep as I imagined the possibilities. This week, I headed off to a local reuse centre (the Burlington Reuse Centre - bar none, my favourite place to shop), in search of a jewelry box in need of some love. I found this adorable little jewelry box with a drawer. It was pretty dirty and had a few chinks taken out of the finish, so I figured it was a perfect candidate for some upcycled glory. 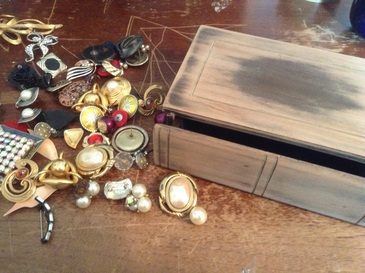 After taking it home and cleaning it, the first thing I did was sand down most of the dark finish to smooth out some of the chinks and scratches. Then, I picked through my stash of 80s earrings, broken brooches and partner-less earrings to see what ensemble would work. The moment I saw this box at the reuse centre, I knew I could use some old earrings as drawer pulls . . . a moment of upcycling destiny, I'd say. 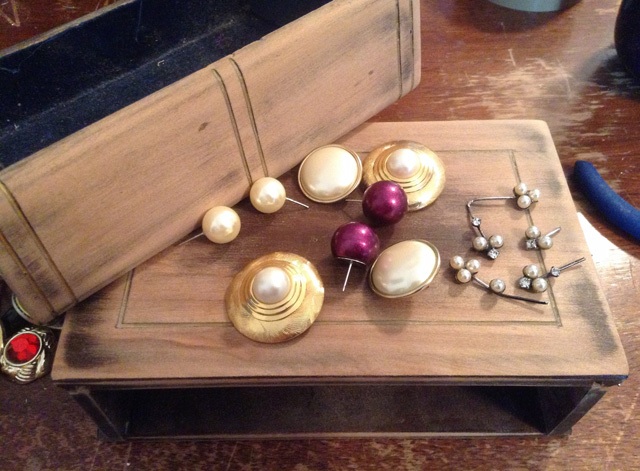 I decided to go with a pearl theme. I picked out some post back earrings and a brooch that had fallen apart (on the right in the photo). I also used some earring posts that had lost their dangled attachments.  Post back earrings are perfect for this sort of project because the posts can be used as pins for attaching to surfaces. I cut down each post at an angle to create a sharp pinpoint. Then, I arranged all the pieces the way I wanted them. Based on my layout, I drilled tiny holes into the wood, into which I could insert the earrings. Before pinning the earrings into the wood, I added some glue (my beloved Weldbond), just to make sure everything stayed secure. I attached the brooch pieces with glue, tucking them underneath and between the earring pieces. And here's the result! I'm pretty happy with how this little jewelry box turned out, and I think it will make a great addition to the top of my dresser. Thanks to the Team Upcyclers challenge, I got motivated to rethink, and found a new purpose for some long-neglected implements of fashion. 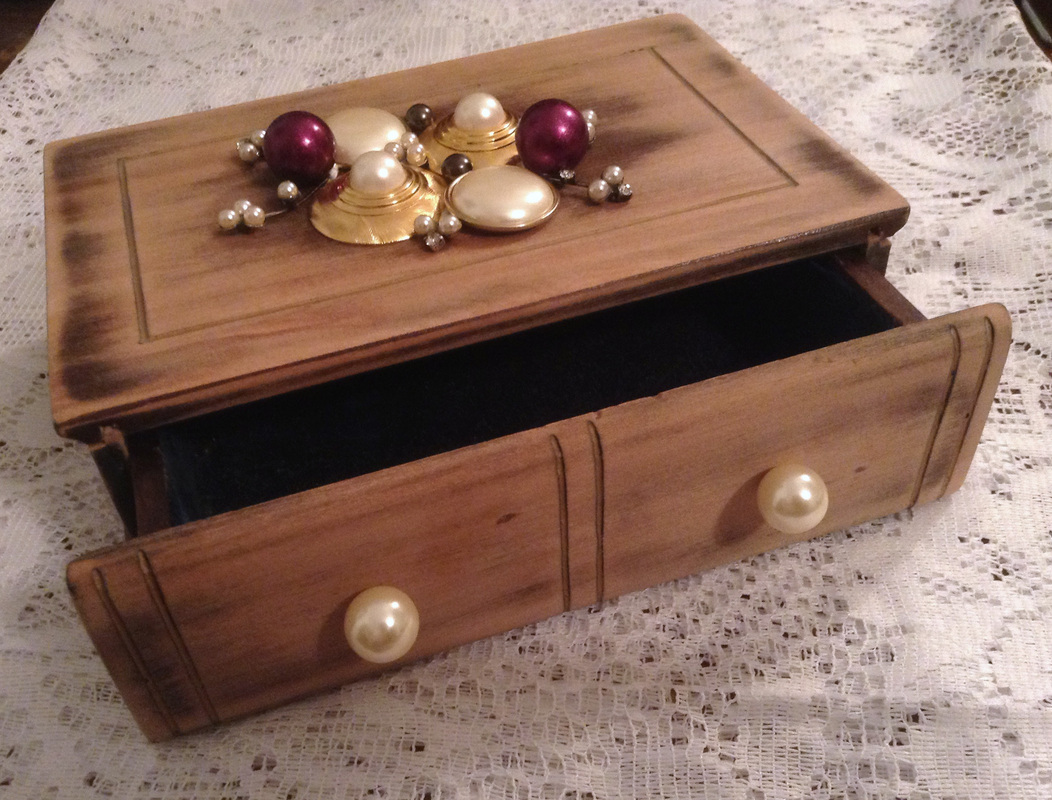  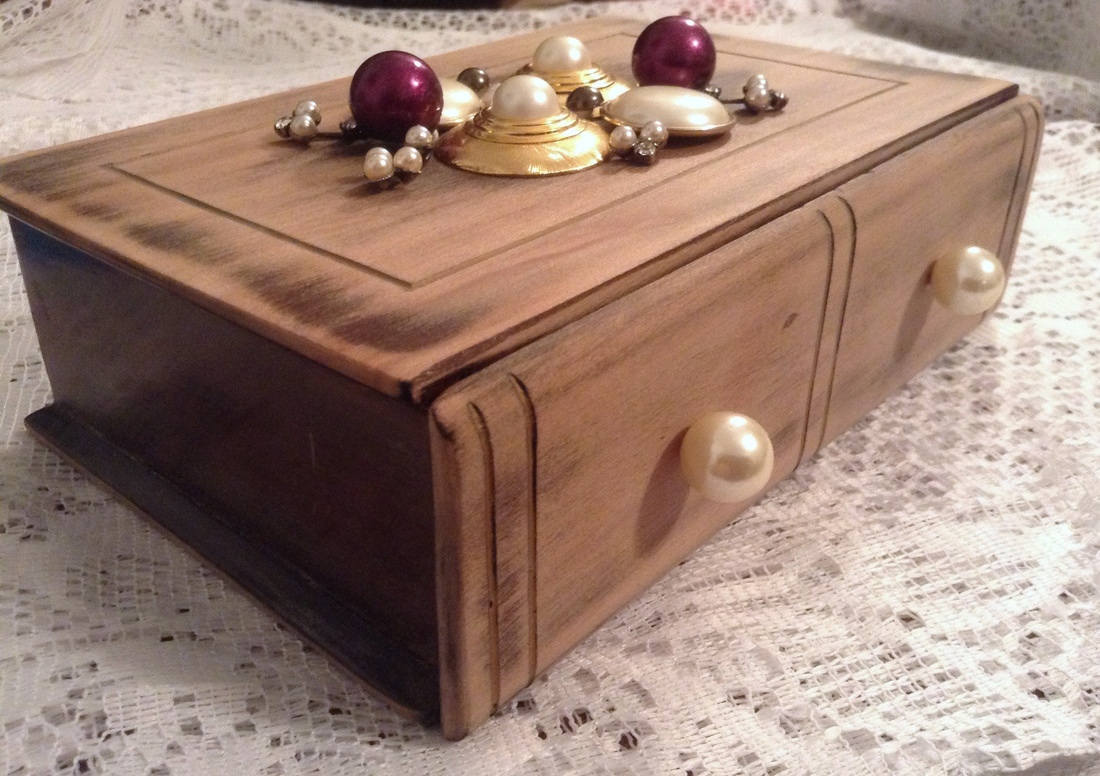 4/24/2013 Tubular Tutorial: Create a Craft Organization Station with Recycled Toilet Paper RollsRead NowMy new favourite discovery is the virtuous versatility of the toilet paper roll. This sturdy paper tube is handy for so many things, and I find myself using it more and more in my studio to organize art and craft tools. My newest endeavour is an organization station (yes, I'm rhyming on purpose) for all my markers - made with 28 recycled toilet paper rolls - and I thought I'd tutorialize the process for those of you who could benefit from some colourful tidiness.
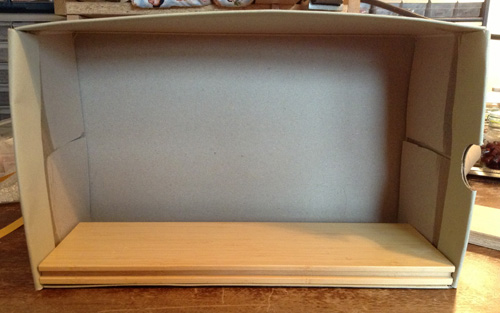
I set my end piece of hardwood flooring inside the long side of the shoe box. If you have no room to set your weighting inside, just adhere it to the bottom of the box.
|
Jane Hogeterp Koopman
Subscribe to Jane's Blog by RSS or email:
Categories
All
Archives
January 2018
Stuff I love:
|


 RSS Feed
Proudly powered by Weebly