JANE KOOPMAN ART AND JEWELRY

Messy Rest

ideas and observations about everyday wonders
from a girl who has never been able to keep her room clean
Blog Home
  • Home
  • About
  • Gallery
    • Maps
    • Domestic Materials
    • Art Cards
    • Jewelry >
      • Necklaces
      • Earrings
      • Bracelets
  • Sales
  • Start a Jane Jar
  • Contact
  • Blog

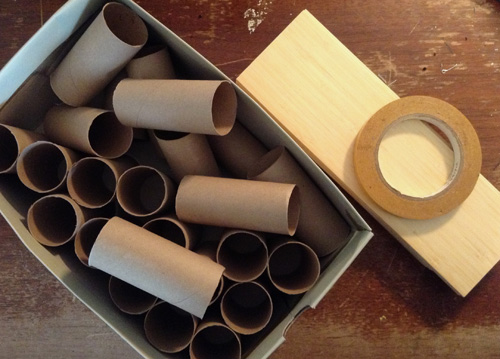
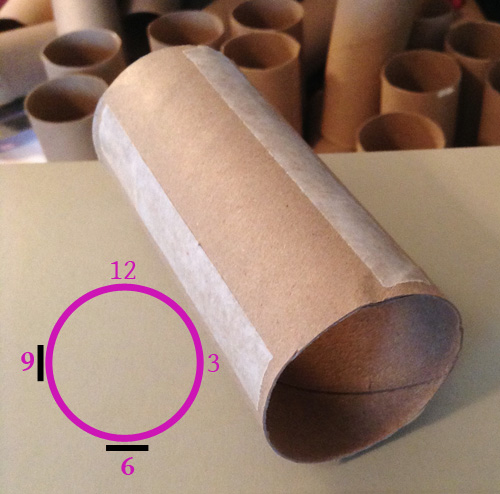
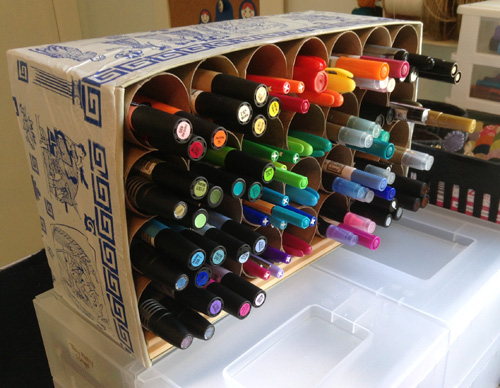
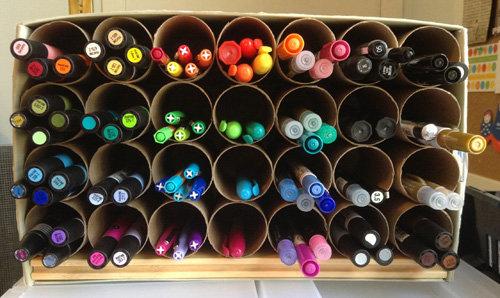
4/24/2013

Tubular Tutorial: Create a Craft Organization Station with Recycled Toilet Paper Rolls

5 Comments

Read Now
 
My new favourite discovery is the virtuous versatility of the toilet paper roll. This sturdy paper tube is handy for so many things, and I find myself using it more and more in my studio to organize art and craft tools. My newest endeavour is an organization station (yes, I'm rhyming on purpose) for all my markers - made with 28 recycled toilet paper rolls - and I thought I'd tutorialize the process for those of you who could benefit from some colourful tidiness.
Here's what you'll need:
  • a fairly sturdy box: use whatever size will accommodate your storage needs - I used a shoe box
  • enough TP rolls to fill it
  • double-sided tape (glue would also work, but DS tape is quicker for those of us who are impatient)
Picture
  • something to add weight and sturdiness to the base of the box: I used an end piece off some hardwood flooring - another option would be to stick together a few pieces of heavy cardboard
Start by lining up your TP rolls inside the box to see how they'll fit. If you have a gap at the bottom, that's perfect: you can place your weighting wood/cardboard there. If you have gaps at the sides, you could adhere some cardboard to the insides of the box to fill the gaps (or get creative by adding in some other odds and ends).
Picture
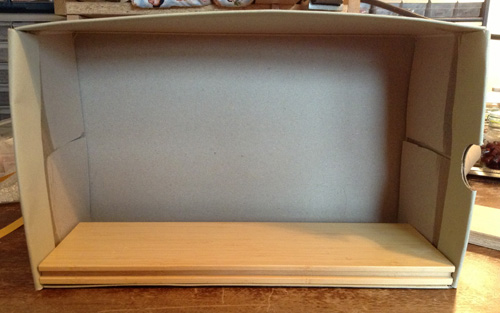
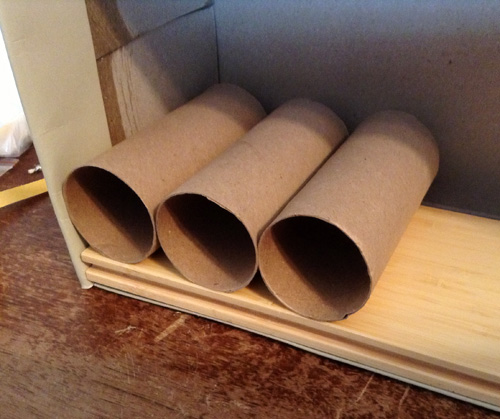
I set my end piece of hardwood flooring inside the long side of the shoe box. If you have no room to set your weighting inside, just adhere it to the bottom of the box.
Now, take one of your TP rolls. Put a piece along the length of the tube at the side (at 9:00), and another one along the bottom (at 6:00). (Sorry, the TP roll in the photo is flipped over so you can actually see the tape.) You'll affix the 9:00 sticky side to the side of the box, and you'll affix the 6:00 sticky side to the bottom of the box. Repeat this across the bottom of the box. You'll need to apply double sided tape to three sides of the last TP roll in the row.
Picture
Repeat the process for the remaining rows. For the top row, you'll need an additional piece of double sided tape on the top side (12:00) of each roll. It's a little tricky getting the last TP roll of each row into the tight space, but you can be pretty aggressive. It's cardboard, after all.
Picture
And there you have it, folks: an uber cool organizer with lots of tubular compartments for all your crafty tools. If you're really ambitious, you can decorate the outside of the box. I covered mine with some old wrapping paper I had laying around.

And hey, if you're not arty or crafty - and don't get all keyed up by seeing beautifully organized markers - you can use this organization station to store other stuff around the house. You could use it to store wires and cables, your assortment of string and twine, pens . . . anything you like . . . except knives, maybe.
Picture
Picture
I like markers.

Share

5 Comments

4/17/2013

Be Dippy: Reuse Your Pizza Dipping Sauce Containers for Small Storage

0 Comments

Read Now
 
Again and again, I am reminded that necessity truly is the mother of invention.

I'm always on the hunt for bead storage solutions in my studio. I get a lot of my beads by disassembling old, forsaken necklaces: that means I end up with a lot of small piles of beads, and I don't usually have enough tiny bags or containers to separate them. And though the current disaster-area state of my studio would indicate otherwise, I do like to keep things organized.

A recent pizza night at my house offered a solution. I was cleaning up after chowing down on a large with pepperoni, bacon, mushrooms and green olives (mmmmm), and was washing out the half-finished containers of dipping sauce. (I am not a dipping sauce fan, but my husband, Dan, is.) These plastic containers can be recycled in my city, but as I washed them out, I thought, "Hmmm . . . they're small, they have lids, they're kind of transparent . . . perfect!" I washed them extra thoroughly to remove any residual aromas. I don't want garlic-scented beads, after all.

These wee containers are so perfect for storing small piles of beads. I can't believe I hadn't thought of it before. Besides the virtues I've already mentioned, they're also lightweight and stackable. They could be reused as small storage for all kinds of things around the house: buttons, tacks, nails and screws, game pieces, paper clips . . . you know, all those little odds and ends that dwell among the dust bunnies at the bottom of your junk drawer.

Reusing these dipping sauce containers combines two things I love, love, love: reducing waste and saving money!!
upcycled bead storage
stackable small storage
repurposed bead storage
The transparent lids of dipping sauce containers make it easy to find small odds and ends.
bead storage
You would never believe that dipping sauce containers can store up to 90 8mm beads. But they can!

Share

0 Comments

4/11/2013

Don't Trash Your Wrapping Tissue Paper

4 Comments

Read Now
 
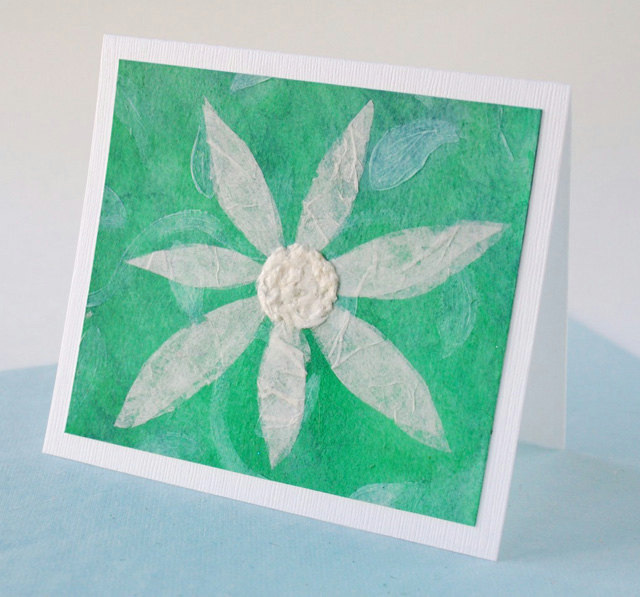
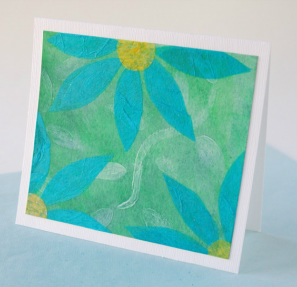
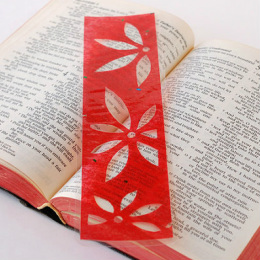
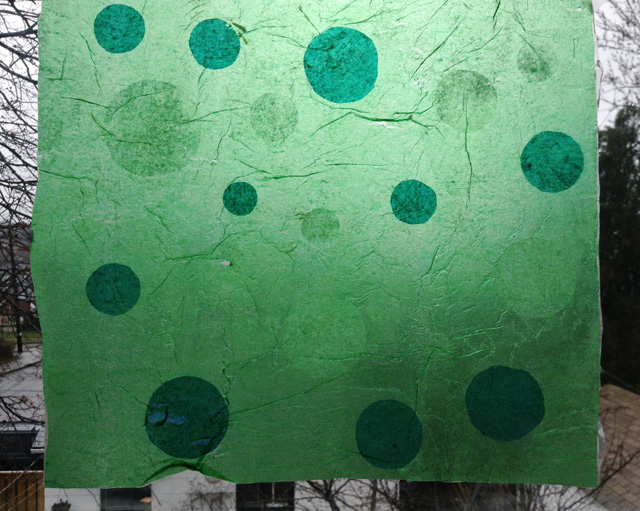
We've all seen it: the tissue paper carnage that results from Christmas mornings, birthdays, baby showers and wedding showers. Giant clouds of tissue paper get stuffed into big garbage bags to be put on the curb, bound for the landfill.

Tissue paper is one of those grey area products when it comes to recycling. Some municipalities won't recycle tissue paper because it often contains additives - like wax, glitter or foil - that are problematic in the recycling process. We can, of course, reuse tissue paper in our own gift wrapping and packaging, but in doing so, we can't be certain that it won't get thrown away.

Lucky for us, we don't need to throw away tissue paper or recycle it because there are so many marvelous household and creative uses for the stuff. I'll focus on some creative uses in this post.

Tissue paper is marvelous stuff to use in art because you can manipulate it and layer it in so many ways to create really cool effects. I'll show you some examples from my own work. I created these art cards using tissue paper:
tissue paper art
I made the white flower on this card by layering pieces of white tissue paper for the petals, and bunching together small shreds of tissue paper for the centre.
tissue paper art
I made the flowers on this card with scraps of blue and yellow tissue paper.
Here, I played around with some tissue paper to create texture for a painted background. I painted some gloss medium onto a piece of paper, then laid tissue paper loosely on top, and pressed down lightly to adhere it. Then, I painted over the surface with more gloss medium to set all the interesting textures created by the tissue paper.
tissue paper art
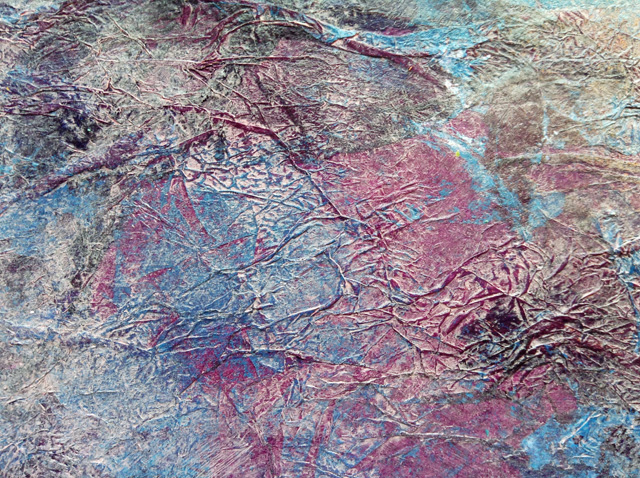
You can also use tissue paper to make something called "crystalline paper". All you need is some gloss medium and some freezer paper to use as a work surface. To learn how to make it, check out this easy tutorial about how to make crystalline paper, or watch this video about how to make crystalline paper. Look how super fun it is:
crystalline paper bookmark
I used red tissue paper that contains little pieces of coloured foil to make the crystalline paper in this bookmark. If you look closely, you can see the book's words through the paper.
crystalline paper
Here's some crystalline paper that I made with green tissue paper and circles of white and teal tissue paper. I took the picture of the paper hanging in a window to show the beautiful translucency of the paper.
This just scratches the surface of all the marvelous creative things you can do with tissue paper. And the great thing is, it's no problem to store because you can smush it into whatever space you have available!

Share

4 Comments

4/8/2013

My Garden Plan: Growing Perennials in Containers

0 Comments

Read Now
 
I really love winter, especially when it's extra snowy, but by late February, I start to get the garden itch. By mid-March, I'm very itchy: my living room floor is strewn with garden books and Lee Valley catalogs, and my Google search history is peppered with garden blogs.

It has been an especially long winter where I live in Hamilton, Ontario. It's April, and winter still isn't quite ready to leave. When it finally does, I will dig into the plans (pun very much intended) I've been making for the last two itchy months.

This year, my big plan is to add some decoration and colour to the un-plantable spaces around my house with potted perennials. Wha?! Potted perennials, you say? Yep. It can be done.

I'm not a fan of annuals, and I'm not good at growing them. But I adore perennials, and I'm okay at growing them, so I did a little research to see how they might fare in containers. It turns out they do just fine. Several varieties will even survive through the winter, and that's what I'm after. This great article about how to grow potted perennials has a helpful list of such varieties and explains some techniques for over-wintering your potted perennials.

Growing perennials in containers has several virtues:
  • You can add plant life to spaces where you can't grow anything (like that awkward space beside your house or on your patio).
  • You can add colour to areas of the garden that are finished flowering.
  • When you divide perennials in your garden, you have a use for the divisions your friends don't want.
  • You don't have to spend money each spring on new annuals for all your pots.
Fortunately, a lot of the plants I already have in my garden do well in containers: Bellflower (Campanula), Coneflower (Echinacea), Coral Bells (Heuchera), Creeping Phlox, Daylily (Hemerocallis), Hardy Geranium (Cranebill), Hosta and Jacob's Ladder (Polemonium). (Check out the above article for more varieties.) All I need to do is divide what I already have: my only cost will be some potting soil. Still, I might just have to poke around some garden centres to see if some other perennials need a new home . . .

These perennials that I already have in my garden will do well in pots . . .

Creeping Phlox
Creeping Phlox - photo, Jane Koopman
Polemonium (Jacob's Ladder)
Jacob's Ladder (Polemonium) - photo, Jane Koopman
Coreopsis (Tickseed)
Coreopsis (Tickseed) - photo, Jane Koopman
Coral Bells (Heuchera)
Coral Bells (Heuchera) - photo, Jane Koopman

Share

0 Comments

4/1/2013

The Landfill Harmonic Makes Beautiful Music Out of Trash

1 Comment

Read Now
 
Landfill Harmonic
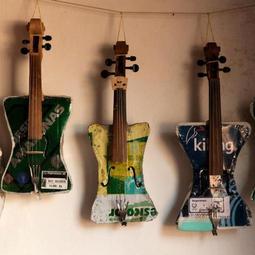
You know how sometimes you get so inspired that you can hardly contain it, like you want to burst? That's how I felt when my sister-in-law forwarded me a little video about a youth orchestra in Paraguay that plays instruments made from trash. They call themselves the Landfill Harmonic.

The group is based in the town of Cateura, which is - in essence - built on a landfill. Many people make their living by scrounging through the trash to find things they can sell and recycle. The town is plagued by crime and drugs, and more than 40% of the youth don't finish school because their parents need them to work. In this dereliction, the Landfill Harmonic is a hope-inspiring creative outlet for the kids who call Cateura home.

Picture
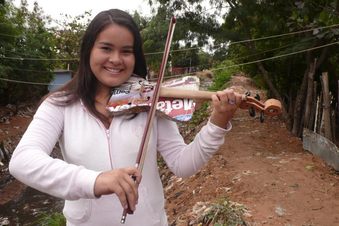
Maria, a member of Landfill Harmonic
A documentary about the ensemble has been in the works for a couple years, and the film's trailer has been gaining popularity on web and media outlets. And today - April 1, 2013 - the Landfill Harmonic began a campaign to raise funds to take the youth orchestra on a world tour. You can find out more about the campaign - and hey, even donate - by visiting the Landfill Harmonic movie site.

I could write a lot more, but really, the video says it so much better than I ever could. You'll be amazed by how beautiful scraps of tin and an old oil drum can sound. Have a look and a listen, and prepare to be mind-blowingly inspired.

Share

1 Comment
Details

    Jane Hogeterp Koopman

    Picture

    Subscribe to  Jane's Blog by RSS or email:

    RSS Feed

    Enter your email address:

    Delivered by FeedBurner

    Categories

    All
    Gardening
    Happy At Home
    Inspiration
    Making Art
    Making Food
    Remaking/Upcycling
    Ten Thousand Villages Artisans

    Archives

    January 2018
    December 2016
    July 2016
    June 2016
    May 2016
    January 2016
    June 2015
    May 2015
    April 2015
    March 2015
    February 2015
    January 2015
    December 2014
    November 2014
    October 2014
    August 2014
    July 2014
    June 2014
    May 2014
    April 2014
    March 2014
    February 2014
    January 2014
    November 2013
    October 2013
    September 2013
    August 2013
    July 2013
    June 2013
    May 2013
    April 2013
    March 2013
    February 2013
    January 2013

    Stuff I love:

    • All Sorts Gallery
    • Burlington Centre for the Arts   
    • Love2Upcycle blog
    • Mixed Media Art Store
    • The Mustard Seed Co-op
    • Ottawa Street Farmers Market
Proudly powered by Weebly
  • Home
  • About
  • Gallery
    • Maps
    • Domestic Materials
    • Art Cards
    • Jewelry >
      • Necklaces
      • Earrings
      • Bracelets
  • Sales
  • Start a Jane Jar
  • Contact
  • Blog